“Zebra-Striping” is the name for a common technique for reports or long lists of items where each row is given a colour distinct from those adjacent to it. The most common is for rows to alternate gray and white backgrounds. The Windows Forms ListView Control does not come with this ability built in, so you have to add it yourself. The problem is that the brute-force approach of setting the background and foreground (if desired) of every item in the control is fraught with peril, because future changes to the ListView such as sorting it will result infunky colourations, Or at the very least you will need to perform the same logic again to colour everything correctly.
One way around this is to exploit the ListView’s OwnerDraw functionality. This can allow you to change the background and foreground of an item based on it’s positional index, but the change will only be made when necessary. Then you can set it to draw the default method and forget about it all.
This is the basis for the ZebraStriper class.
|
1 2 3 4 5 6 7 8 9 10 11 12 13 14 15 16 17 18 19 20 21 22 23 24 25 26 27 28 29 30 31 32 33 34 35 36 37 38 39 40 41 42 43 44 45 46 47 48 49 50 51 52 53 54 55 |
using System; using System.Collections.Generic; using System.Drawing; using System.Linq; using System.Text; using System.Threading.Tasks; using System.Windows.Forms; using System.Windows.Forms.VisualStyles; namespace ExampleStriper { /// <summary> /// /// Zebra Stripes a Windows Forms ListView Control. /// </summary> class ZebraStriper { private static readonly Color[] DefaultStripes = new Color[] { SystemColors.ButtonFace, SystemColors.Window }; private static readonly Color[] DefaultForeColors = new Color[] { SystemColors.ControlText,SystemColors.ControlText}; private Color[] Stripes; private Color[] ForegroundStripes; private ListView HandleList = null; public ZebraStriper(ListView Target):this(Target,DefaultStripes,DefaultForeColors) { } public ZebraStriper(ListView Target, Color[] pStripeColors,Color[] pForeColors) { Stripes = pStripeColors; ForegroundStripes = pForeColors; HandleList = Target; HandleList.OwnerDraw = true; HandleList.DrawItem += HandleList_DrawItem; HandleList.DrawColumnHeader += HandleList_DrawColumnHeader; } void HandleList_DrawColumnHeader(object sender, DrawListViewColumnHeaderEventArgs e) { e.DrawDefault = true; } void HandleList_DrawItem(object sender, DrawListViewItemEventArgs e) { if (e.Item.ListView.View == View.Details) { e.Item.BackColor = Stripes[e.Item.Index % Stripes.Length]; e.Item.ForeColor = ForegroundStripes[e.Item.Index % ForegroundStripes.Length]; } e.DrawDefault=true; } } } |
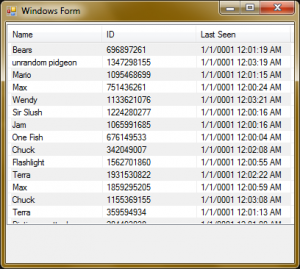
The given class allows you to zebra stripe your ListView instances. Here are some examples and what they look like. lvwSortTest is the ListView Control, and zs is a “ZebraStriper” member variable:
|
1 |
zs = new ZebraStriper(lvwSortTest); |
This looks like this:
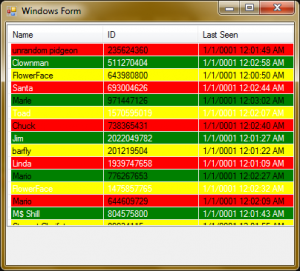
But how do we customize it? What if we want it to switch between Red,green, and yellow, for that christmasy theme we all love? We got you covered, though we won’t be held liable for your garish design choices:
|
1 |
zs = new ZebraStriper(lvwSortTest,new Color[]{Color.Red,Color.Green,Color.Yellow},new Color[]{Color.Black,Color.White}); |
Which gives us:
Of course in general it’s a good idea to choose colours that are not so high-contrast. a light gray with a white; a dark gray with black, etc. as well as making sure the text is readable (here, the white text sometimes appears on a yellow background due to the way the sequences line up, which is of course hard to read).
Either way, this particular method works a lot better than simply looking through the control; it only fires for controls that need to be drawn, so it doesn’t actually loop through every item. It also segregates the logic into a separate, reusable class, which can be helpful.
Have something to say about this post? Comment!


